


Two Easy Ways to Start Earning Rewards!
Become a member today! Members-only pricing and offers, personalized care notifications, Vital Care points back on every purchase and more!
 Become a credit card member today!
Earn 2X Pals Rewards points at Petco
when you use Petco Pay!APPLY NOWLearn More About Petco Pay Benefits
How to Use an Aquarium Gravel Vacuum
Published on August 18th, 2022
Updated on June 18th, 2026


Reviewed by Don Spaeth
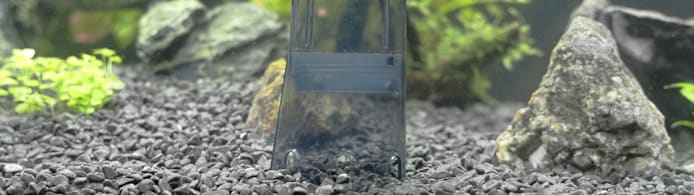
Gravel vacuuming helps remove solid waste from your substrate. Learn about the different types of gravel vacuums available & how to clean your fish tank.
Routine syphoning of organic waste from your substrate during maintenance is important to the overall health of your aquatic life; this process is commonly referred to as gravel vacuuming! Gravel vacuuming helps remove solid waste from your substrate, and other surfaces, that could potentially cause harmful spikes in ammonia, nitrite and nitrate.
A gravel vacuum usually has a solid rigid tube (imagine a paper towel roll), that has a cap that connects to a longer, thinner, flexible aquarium tube. There are a few widely used methods for achieving the suction needed to allow a gravel vacuum to function properly and they each have their own advantages. Let’s get to the bottom of the methods and how to properly achieve the syphoning needed to perform a thorough gravel vacuuming!
Faucet Assisted Gravel Vacuums
This version of the gravel vacuum might be the easiest, but requires you to be as close to your sink as possible to run the hose from your sink to your aquarium. The kit will generally come with a faucet adapter, a rigid tube for collecting the waste and a long flexible tube to transport the water and waste to the sink. The faucet adapter will have two settings, one for pulling water and waste from the tank and the other for refilling the tank with faucet water. When set to pulling water from the tank, the faucet water will create a vacuum effect as it rushes water past the opening in the tube that is running to your tank, causing the flow of water to be pulled back towards the faucet through the rigid tube, down the flexible tube and into your sink. To ensure you have optimal flow, turn your faucet all the way on and make sure there are no kinks in your hose.
Pump/Bladder Assisted Gravel Vacuum
A more compact method that uses some of the same core parts as the faucet version; a rigid tube with cap that converts to the smaller flexible tube. Instead of a faucet and sink though, there is an inline pump/bladder which empties into a bucket. Place the rigid tube underwater with one hand and place the flexible tube’s end in the bucket before giving the bladder a few pumps to begin water flowing from the tank into the bucket. Once you notice the flow of water has removed all the air from the line, keep the rigid tube underwater and begin carefully syphoning.
Manual Gravel Vacuums
Manual gravel vacuums (also called siphon vacuums) take a little practice, but once the siphon is flowing, they clean just as effectively as any other type — and they give you the most control over how much water you remove.
What you'll need: a manual gravel vacuum (rigid tube attached to flexible tubing) and a clean bucket.
Safety first: Never use your mouth to start a siphon. Even a small amount of fish tank water reaching your mouth can introduce harmful bacteria and cause illness. Always use the hand-priming method described below.
Step-by-Step: How to Start a Manual Siphon
Step 1 — Set up your bucket Place your bucket on the floor next to the fish tank, lower than the water line. Hold the open end of the flexible tubing over the bucket with one hand, keeping your thumb ready to cover the opening.
Step 2 — Prime the rigid tube With your other hand, hold the rigid tube and submerge it in the fish tank, positioning it parallel to and just above the gravel. Slowly tilt the top of the tube upward — this lets air escape and allows water to fill the tube from below.
Step 3 — Capture water in the tube Once the tube is angled upward and filling with water, lift it in a smooth scooping motion to capture as much water inside as possible. If needed, raise the tube partially out of the water — the water column inside will begin flowing down through the flexible tubing toward the bucket.
Step 4 — Cap the flexible tube The moment you see water moving through the flexible tubing, press your thumb firmly over the open end above the bucket to trap the water inside the line. This is what keeps the siphon primed.
Step 5 — Return the rigid tube to the gravel With your thumb still sealing the flexible tube, use your free hand to lower the rigid tube back into the fish tank. Position it parallel to the gravel and submerged.
Step 6 — Purge remaining air With the rigid tube back underwater, tilt it slightly upward while keeping the tip submerged. This encourages any remaining air bubbles to escape from the line and be replaced by water.
Step 7 — Release and vacuum Once air has cleared from the rigid tube, lift your thumb from the flexible tubing end over the bucket. Water should begin flowing steadily — your siphon is now running. Guide the rigid tube gently into the gravel in short plunging motions to lift debris, working in sections across the bottom of the fish tank.
If the Siphon Doesn't Start
No flow after Step 7? That's normal on your first few tries. Simply repeat Steps 2 through 6 to displace more air from the line. Each attempt pushes a little more air out and draws more water in — most pet parents get a steady siphon within two or three tries.
| Problem | Likely cause | Fix |
|---|---|---|
| No water flow after releasing thumb | Too much air still in the line | Repeat the priming steps 2–3 more times |
| Flow stops mid-vacuum | Tube lifted above the water line | Keep the rigid tube fully submerged while vacuuming |
| Gravel getting sucked into tube | Tube held too close to the gravel | Hold the tube 1–2 inches above the surface and move slowly |
Once you have a reliable siphon going, move methodically across the fish tank floor, spending a few seconds in each spot to pull debris up and out. When you've removed the right amount of water for your scheduled water change, cap the flexible tube with your thumb to stop the flow, then lift the rigid tube clear of the tank.
Vacuuming Efficiently — and Safely
Once the siphon is running, the goal is to work methodically so you spend as little time disturbing the tank as possible — less disruption means less stress for your fish.
The Right Motion for a Clean Substrate
Press the rigid tube of the aquarium gravel vacuum straight down into the gravel until it gently touches the bottom of the fish tank. Watch as the substrate tumbles and separates inside the tube, with lighter waste particles lifting up and flowing toward the bucket while the heavier gravel stays behind. As soon as you see the gravel rising inside the tube, slowly lift the tube upward — this lets the gravel fall back down while the waste continues moving through the siphon. Then shift the tube a few inches to a fresh patch of gravel and repeat.
Keep the gravel below the halfway point of the rigid tube at all times. When too much gravel gets pulled up, it restricts flow and makes the siphon far less effective at removing waste. The steady press-and-lift rhythm is what keeps the vacuum working at its best.
Work in a consistent pattern — row by row or quadrant by quadrant — so you cover the entire bottom without doubling back over already-clean areas. This is the single biggest time-saver when gravel vacuuming.
Watch Your Fish While You Work
Cleaning can feel routine, but your fish need your full attention throughout the process. Here's what to keep an eye on:
- Fish proximity. Move the tube slowly and deliberately, steering clear of fish, invertebrates and any other tank inhabitants. If a fish does get drawn into the rigid tube, stay calm — break the siphon immediately by lifting the tube above the waterline or pinching the hose, then gently guide the fish back into the tank using the least stressful method possible. Monitor that fish closely for the next 48–72 hours for any signs of injury, labored breathing or unusual behavior, and consult your veterinarian if you notice anything concerning.
- The bucket or sink. Never let the bucket fill unattended. Break the siphon when the bucket reaches about 75% capacity — there will still be water sitting in the tube, and stopping early gives you room for that remaining water to drain in as you slowly lift the tube out. Only fill the bucket to a weight you can safely carry and empty. If you've connected your gravel vacuum to a sink, watch the drain rate continuously to make sure it keeps up with the incoming flow.
- Electrical equipment. Water and electricity are a serious combination. Keep the tube and hose away from power strips, cords and outlets at all times.
Safety Reminders — Every Water Change, Every Time
These steps are non-negotiable for the safety of both you and your fish:
| What to do | Why it matters |
|---|---|
| Never use your mouth to start the siphon. | Aquarium water contains bacteria and waste that pose a health risk to you. Use a self-starting gravel vacuum or a squeeze-bulb primer instead. |
| Unplug heaters at least 20 minutes before a water change (and pumps if they'll be exposed to air). | A heater element that runs dry or is suddenly submerged in cooler water can crack or fail — and create an electrical hazard. |
| Break the siphon before the bucket hits 75% full. | Leaves room for the water remaining in the tube and keeps the bucket at a manageable, safe weight. |
| Treat all new tap water with an aquarium-safe water conditioner before adding it to the tank. | Tap water typically contains chlorine and chloramine, which are harmful to fish and beneficial bacteria. |
| Match the temperature of replacement water as closely as possible to the tank water. | Sudden temperature swings stress fish and can suppress their immune response. |
| Keep towels nearby. | Spills happen — having towels on hand protects your floors and lets you respond quickly. |
| Move slowly around tank inhabitants throughout the entire process. | Rapid movements and accidental contact with the siphon tube can cause serious injury to fish and invertebrates. |
After the Water Change
Once you've finished gravel vacuuming and refilled the tank with conditioned, temperature-matched water, take a few minutes to observe your fish. Normal behavior — active swimming, healthy appetite, no clamped fins — is a good sign the water change went smoothly. If you notice lethargy, gasping at the surface or other signs of distress in the hours following a water change, contact your veterinarian or an aquatic specialist promptly.
With a consistent routine and the right technique, your aquarium gravel vacuum becomes one of the most powerful tools you have for keeping your fish's home clean, your water quality stable and your fish thriving.
Frequently Asked Questions
How often should I vacuum my aquarium gravel? For most freshwater fish tanks, plan to vacuum the gravel once a week during your regular partial water change. Heavily stocked tanks or those with messy fish (think goldfish or cichlids) may need vacuuming twice a week, while lightly stocked, planted tanks can sometimes go every two weeks. The goal is to remove organic waste before it breaks down and causes ammonia or nitrite spikes that stress your fish.
Can I vacuum gravel with fish still in the tank? Yes — and in most cases, your fish should stay in the tank during gravel vacuuming. Work slowly and deliberately, keeping the rigid tube close to the substrate and away from any fish. If a fish does get drawn into the tube, immediately break the siphon, assess the situation calmly, and return the fish to the water using the least stressful method possible. Monitor the fish closely for signs of injury or distress over the next 48 hours, and consult your veterinarian if you notice labored breathing, clamped fins or unusual behavior.
What size gravel vacuum do I need for my tank? Match the diameter and length of the rigid tube to your tank size. A narrow tube (roughly 1–1.5 inches in diameter) works well for tanks under 20 gallons and for tanks with fine gravel or sand, because it gives you more control and reduces the risk of pulling up substrate. Wider tubes (2 inches or more) move water faster and are better suited for tanks 30 gallons and up with coarser gravel. The flexible hose should be long enough to comfortably reach your bucket or sink without kinking — most kits designed for larger tanks include 6-foot or longer tubing.
Will gravel vacuuming remove my beneficial bacteria? The majority of your tank's beneficial bacteria colony lives in your filter media, not in the gravel itself, so routine vacuuming will not crash your cycle. A small amount of bacteria does colonize the substrate, which is why it is a good practice to vacuum only half the gravel bed at each session, alternating sections week to week. This approach removes waste efficiently while preserving enough of the substrate bacteria to keep your nitrogen cycle stable.
Do I need to vacuum artificial plants and decorations too? Organic waste and algae can accumulate on decorations just as it does on the gravel bed, so a light pass around the base of artificial plants and along the edges of decorations during each vacuuming session is worthwhile. For heavier buildup, remove decorations during a water change and rinse them in tank water (never tap water, which can kill beneficial bacteria) before returning them to the aquarium.
Is it safe to use tap water when refilling after vacuuming? Tap water is fine to use for refilling as long as you treat it with an aquatic-safe water conditioner to neutralize chlorine and chloramine before it enters the tank. Always try to match the temperature of the replacement water as closely as possible to the existing tank water — a sudden temperature swing can stress fish and weaken their immune response. If you use a faucet-assisted gravel vacuum with a built-in refill setting, condition the water in a separate bucket first rather than running untreated tap water directly into the tank.
This article was created with assistance from AI tools and reviewed for accuracy by Petco's content team.


